So last time I promised to post a guide to creating a basic virtual tour in Unity3D. However, rather than just jumping straight into the solution in a concise and efficient manner I feel compelled to whinge for a paragraph about how difficult it was to get to this solution. This probably won’t be of any use to anyone except me (as some form of self guided therapy) so feel free to skip ahead. For anyone who actually gives a shit, I’ve decided that the majority of the blame for my torrid experience should go to the internet for this one. I’ve gotten used to finding the answers to my problems in the top half of a google search results page in the form of a step by step guide or a nice narrated video. Despite what you might have heard VR is still really new, and although it’s developing at the speed of light if you try to do anything even remotely novel or custom you’re probably going to have to figure it out for yourself. Which leads me nicely to my next point – don’t be an arrogant fool (this probably seems obvious to everyone except me)! I jumped into Unity with a clear idea of what I wanted to achieve (high fiving myself for being so organised) and assumed that, because I had a computer science degree and some student game development experience from 12 years ago, I could just figure it out. It didn’t quite work out that way. I tried to combine multiple guides and tutorials, that each did a little bit of what I wanted to do, and ended up with a mess of massively over complicated code that I didn’t really understand and a huge assets folder that I didn’t need. The main guides that I actually used were the Apps and Games with Game Engines one from Samsung and this Virtual Reality one from Unity3D. Both of which are really great guides if you have just a little bit of unity knowledge and some basic C# coding experience. So do yourself a huge favor and take a basic Unity3D course now. I really like like the Udemy courses because they are cheap like me but they are also really comprehensive and easy to follow. I would highly recommend the Make VR Games in Unity course, and if I had completed this before jumping into Unity (in my defense it didn’t exist then) I would have saved myself weeks of time and you wouldn’t have had to read any of this – rant over!
1. Setup
OK so if you actually followed my advice you have probably already installed Unity and have managed to publish something to a Samsung phone for the GearVR. If not you need to setup your Samsung S6/S7 phone and your computer to work with Unity and the GearVR. You can use these Samsung guides for PC or MAC which are unfortunately quite dated so feel free to download the latest versions of the software that they specify. Full disclosure – there is a lot that can go wrong during this setup. It’s very easy to miss small steps that can screw up the entire process and it can become extremely frustrating (We are working on a more comprehensive guide for this and will publish here when ready). Stick with it and if you get to the end you will be ready to start creating VR experiences in Unity.
2. Unity
Open up a new project in Unity and call it whatever you want. I went with the very descriptive auto name of “New unity project 2”. Step 01 is to get Unity ready for Android and Virtual Reality development.


Now you can start creating your VR experience. Step 02 involves deleting the default camera and lights from Unity and replacing the camera with a special camera provided by Oculus that gives you access to the Left and Right eyes individually.

Go to the Oculus Developer Portal and download the Oculus Utilities for Unity 5.

Virtual reality is actually supported natively in Unity now but we still need these utilities in order to have control over what we display to each eye. We need this control to create the stereoscopic effect which brings pre-rendered VR to life. Without this the feeling of presence is substantially reduced and it becomes obvious that we are looking at a 360 degree render (this is bad). Next we need to import this package.

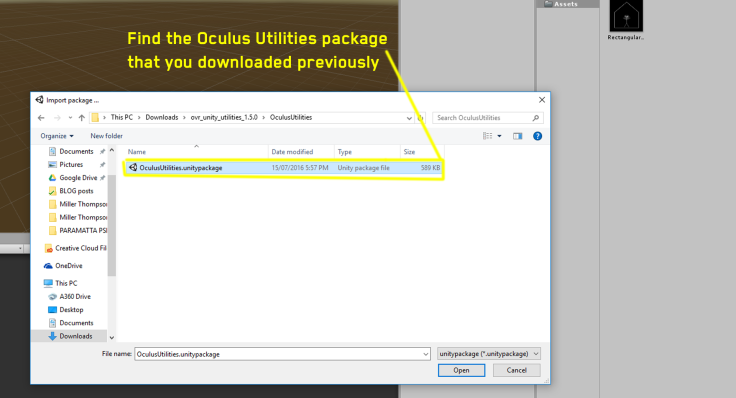

While we only need a tiny part of this import package, there are a lot of dependencies within the package and trying to only import what we need can result in assets not working as expected.
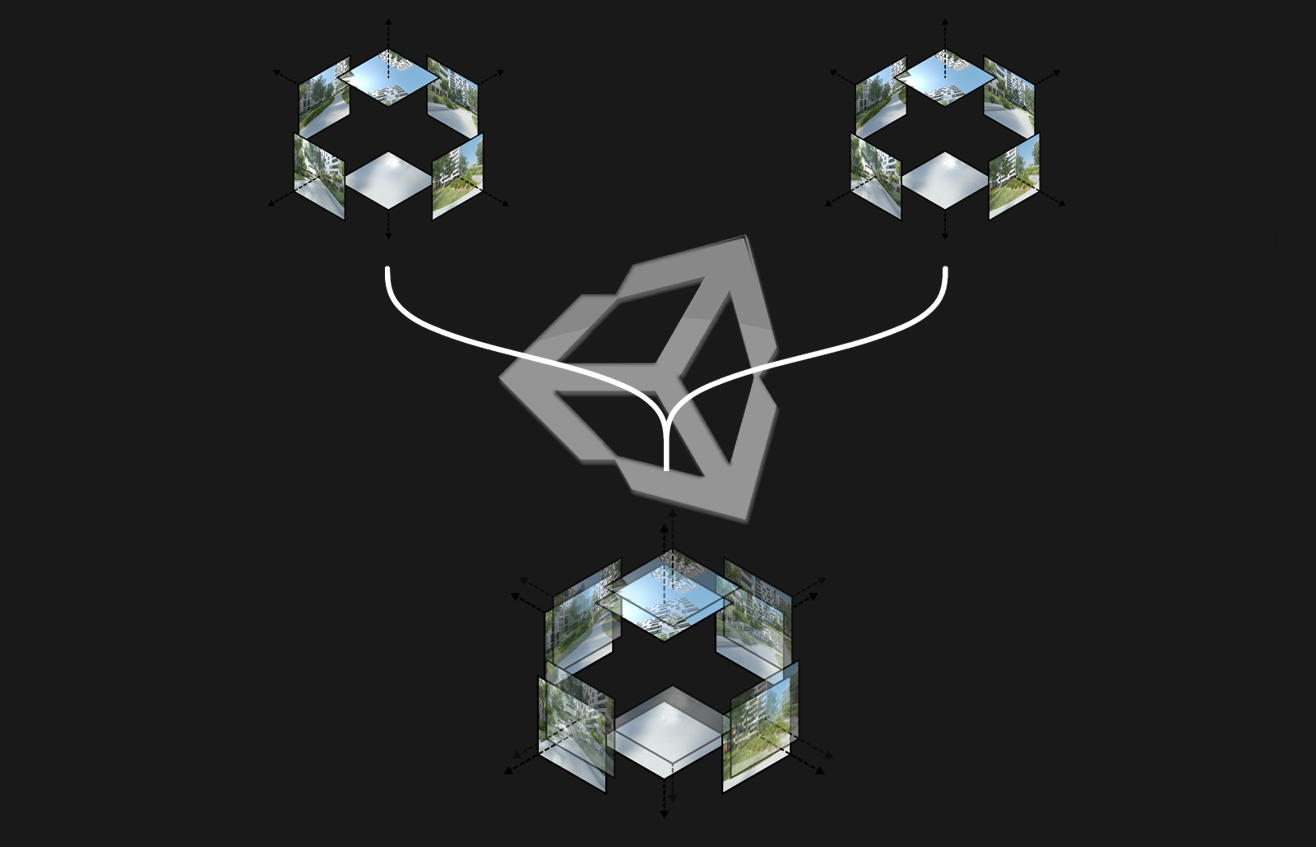
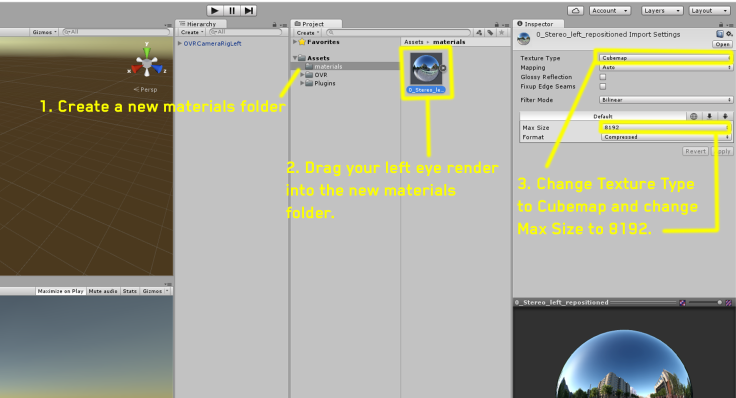
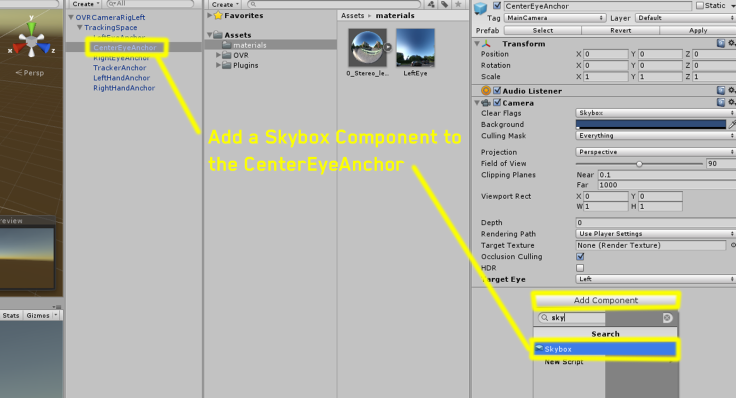
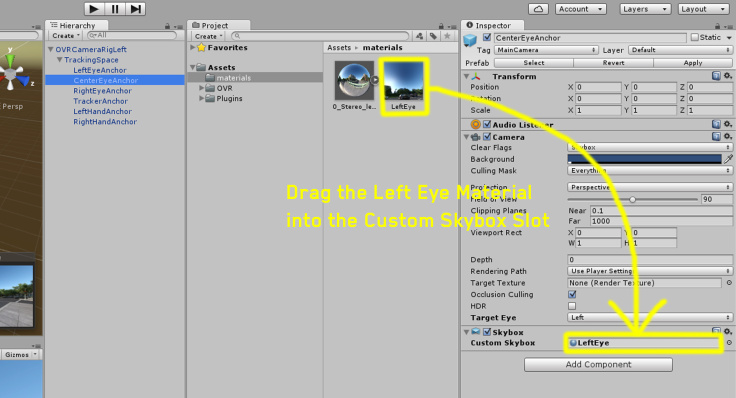
Once we have imported the package we need to find the Oculus Virtual Reality (OVR) camera rig and add it to the scene. In Step 03 we will add the rendered assets to one camera first and we can then copy this camera to save some time. Before heading into this section you should already have your Stereo Render separated into a left and a right eye image and you will import these into unity as 2 separate assets. The example shown is using the Cubemap render format but this will also work with the equirectangular render approach.


You can now repeat the process from Step 03 B for the right eye. Once you have finished the right eye you will have a Unity scene with a Stereo Render ready to build. All you need to do now is get your scene onto your Samsung Phone and pop it into the GearVR (well sort of).
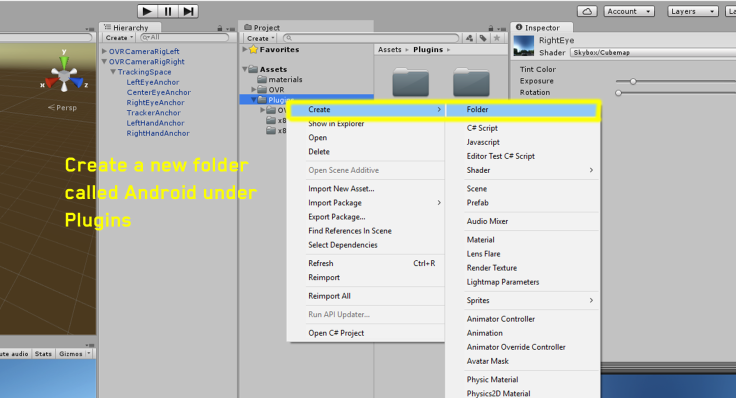
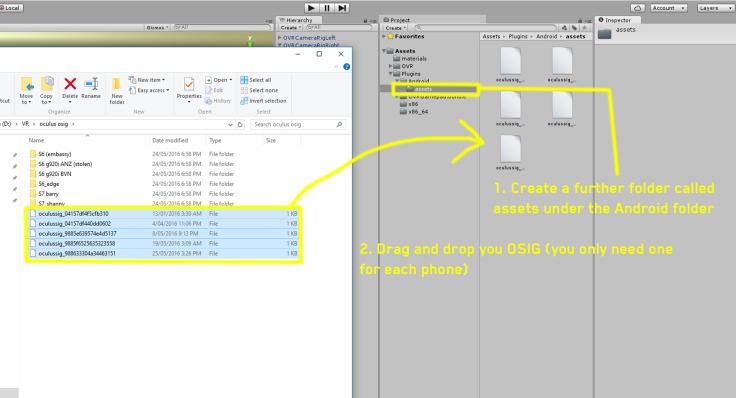
In Step 4 we will build the Unity scene as an App that will run as a standalone VR experience. Unfortunately to make the App work you need your OSIG from Oculus (which you should already have from the Setup at the start). And just to be really annoying you have to put this into a particular folder within the assets folder that have to create yourself.

I probably should have mentioned the fact that you need to connect your Phone to the computer before trying to build to it. If you figured that out all by yourself you should now have an app on your device ready to go (I got pretty excited at this point about the fact that I had built a mobile app without realizing I was building one – apps are easy – thanks Unity). All you have to do now is tap the app, stick the phone into the GearVR, pop it on your face and sit back (if you rendered your scene at sitting height) and marvel at your own brilliance. After a few minutes of (hopefully) pulling a VR face you might start to notice that the experience is not quite as crisp and sharp as when you had viewed the exact same rendered scene using the Oculus 360 Photo app. My reaction, when I eventually got this working (remember it took me a little longer than I would care to admit), was not exactly positive. There is no way in hell I would have went to all that effort to create a locked down client/presentation friendly app if I had known that I would have to compromise on image quality.
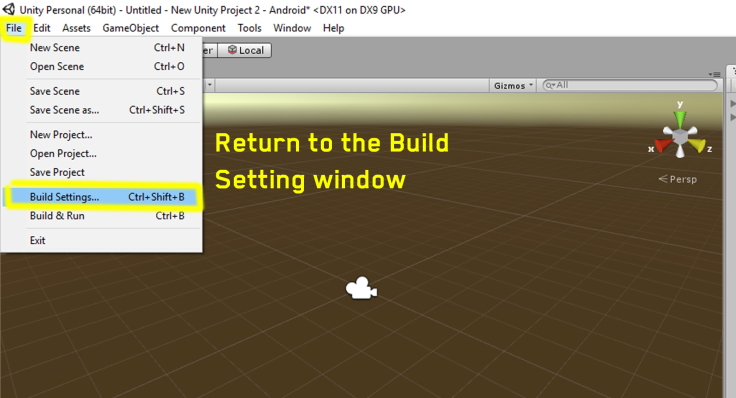
Luckily there is a hidden feature in Unity that allows you to increase the render quality back to what the original render is (finding this was not easy or quick – this thread helped). It’s called Render Scale and Step 5 below will quickly show you how to implement it. Warning – the next section involves cutting and pasting code – for some reason this does not exist as a setting anywhere in Unity’s interface.

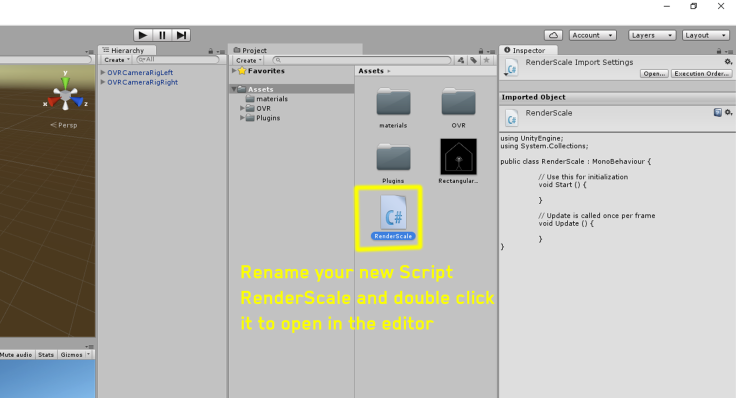
So if your new to scripting you may have just created your first script – if so congrats! Now select the code in the editor and delete all of it (sorry). Paste the following in its place:
using UnityEngine;
using System.Collections;
using UnityEngine.VR;
public class RenderScale : MonoBehaviour
{
[SerializeField]
private float m_RenderScale = 2f; //The render scale. Higher numbers = better quality, but trades performance
void Start()
{
VRSettings.renderScale = m_RenderScale;
}
}
Save the script and jump back into Unity. Most scripts in Unity need to be added to game objects to be included in the scene.


And that should be it! Rebuild the scene to your phone and the detail should appear every bit as gorgeous as it did in the Oculus 360 Photo app. Just a note on the Render Scale – if you have an S6 I wouldn’t recommend going higher than 2.5 as it starts to get a bit laggy. If you have an S7 i’d say go for 3. The difference between the two is really minimal, but still noticeable on the anti-aliasing.
Obviously the main reason for bringing your renders into Unity in the first place is to add interactivity but this feels like enough for one post so lets look at adding basic navigation between scenes in another post.
Barry

Thank you Barry,
Your guide was very helpful and I know what you mean about having to really do your homework to come up with a solution for this. I do have one question… I am new to the whole stereo image thing. Are the two separate images mentioned above (one for the left and one for the right eye) just mirror images of each other or did you take the images with a true stereo camera with two lenses?
Paul
LikeLike
Luckily for us vray takes care of the stereo aspect with it’s stereoscopic helper. It takes the distance between your eyes as the offset between the left and right renders. Sounds simple but it gets really complicated the second you try to look behind you. Chaos Groups guide to VR https://labs.chaosgroup.com/index.php/portfolio/guide-to-virtual-reality-2/ does a great job at explaining the science behind how this works.
LikeLike
Once again Barry thank you for the information. I am beginning to think you are someone I should have on speed dial. 🙂 If you are so inclined please feel free to add me as a LinkedIn contact. https://www.linkedin.com/in/paul-lyrek-0130281
LikeLike
Great tutorial. What is resolution of 360 render image you are using?
LikeLike
Hi Vishal,
The overall render is 18432×1536. That’s 9216×1536 per eye. I generally use the cubemap format so each eye gets 6 cubes of 1536×1536 each. This is the maximum resolution that the GearVR can display due to the screen size of the current range of compatible Samsung Galaxy phones. You can also render to the equirectangular format (like 360 photos and videos) but due to the format you need to render more pixels to get the same resolution so they take quite a bit longer to render.
LikeLiked by 1 person
Hi Barry,
Thank you for the great guide! Just to compare some notes. I have a S6 and S7. When I bumped the render scale to 3, the scene become very laggy when viewed in GearVR. My S6 is only capable of render scaling to 1.5 while my S7 tops at 2.0. Even when I try my S7 at render scale 2.2, it become laggy as well. I am reading your guide and you said than render scaling at 3 has no problem. Am I missing something here? I even disable the mipmaps but it doesn’t help much. Any idea? Thanks in advance.
LikeLiked by 1 person
Hi Gerome,
Strangely enough I have had to pear back my render scale progressively with newer unity builds. I am now working of 2 for the S6’s and 2.6 for the S7’s. No idea what has changed. The loading times between scenes also seems to get longer with newer Unity builds (although I haven’t tried with 5.5 yet).
LikeLike
Hi Barry,
Seems that’s a good place to start to test with older version builds. Thank’s a lot! Will post you my results later.
LikeLike
Hello Barry one question maybe this is a bit noob but i wanted to know, how would you advise the best way to put a ui canvas in this way of VR setup? really good guide.
LikeLike
Somehow managed to miss this post – the main thing to remember is to do everything UI related in world space. Screen space and VR does not work.
LikeLike
Thanks a lot for this great guide, I’m sure it will be helpful for a lot of us not doing game stuff 🙂
I’m looking forward on your post about navigation between scenes!
LikeLike
Hi Barry,
Thanks for the thorough tutorial 🙂 I wanted to ask you a behaviour I perceive when implementing such solution that bugs me.
When I apply two cubemaps to two skyboxes for each eye, to achieve a stereo skybox, the problem that I have is that when I move the head left-right, or up-down, I perceive the skybox “moving” with me (like, if I look up, I see as if the environment follows my upward movement). This behaviour is quite annoying because it takes realism to my whole scene. Did you ever perceive something similar?
Thanks!
LikeLike
So in 2019, the code would be:
using UnityEngine;
using System.Collections;
using UnityEngine.VR;
public class RenderScale : MonoBehaviour
{
[SerializeField]
private float m_RenderScale = 2f; //The render scale. Higher numbers = better quality, but trades performance
void Start()
{
UnityEngine.XR.XRSettings.eyeTextureResolutionScale = m_RenderScale;
}
}
This is working incredibly well and is exactly the thing that finally does the trick!!!!!!
LikeLike